
|
| Home Community Mys-Script Creative Off-Topic |
|
|||||||
 |
|
|
Thread Tools | Display Modes |
|
|
|
#1
 04-28-2011, 12:11 AM
|
|||
|
|||
|
Ohai thar, the name's Cindykt and I'm kinda new here at the moment but I want to give the community a little bit of my -amazing- (not really) talent. I'm going to show you all how to make a very simple ANIMATED yes I said animated pet image.
This tutorial is based in Photoshop, because that's what I'm using and it's very common and extremely good software. First you need to draw an image. I am going to attempt a winged wolf IN PIXEL. Oeear..... Anyways, this is how it turned out, zoomed at 300%. 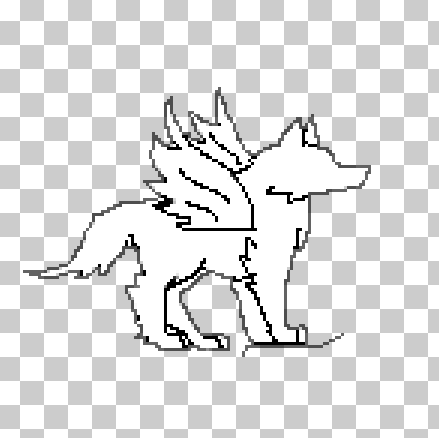 Next, you will need to select the whole drawing, and copy-paste it into a fresh layer. This is where the 'move' tool comes in. Move the second image to where you want it to animate to. For me, I moved it up, to make it almost look like my wolf is jumping off the ground. IMPORTANT: If you move it up so it's flying, remember to add a shadow beneath it. You could also move it to the side, but remember, this is a very simple animation and it will return to the starting image. This is what I did: 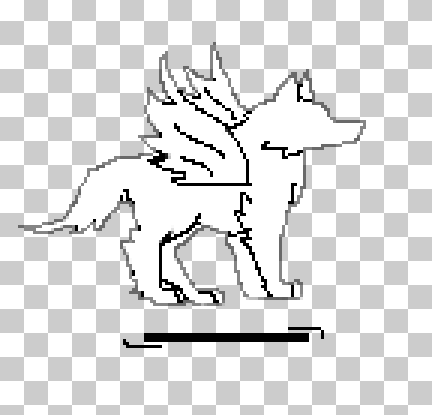 Now for the tricky bit. Go to the 3D menu up the top and check 'animation'. 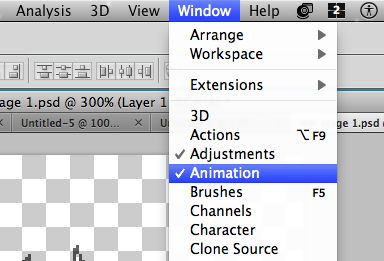 Then hide all the layers in your image except the one you want to be the starting image. Then hide all the layers in your image except the one you want to be the starting image.Now got to the bottom and you should see a menu there with a frame on it of the first image, like this. 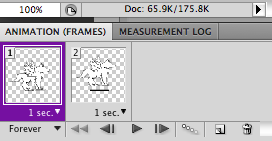 Make a new frame. Make a new frame.Then select the layer with the image on it for the next part of the animation, and click the little button that looks like this.  It should come up with something that looks like this: 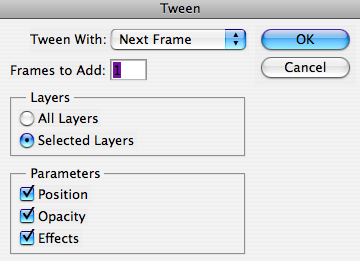 Click 'selected layers'. This will add only the layers you selected to the animation. You can then tweak the dissolve/tween/whatever. The more layers you add, the more it is going to dissolve. For me, I typed in '0' because I wanted it to just go straight to the next image. Make sure at the bottom of the animations toolbar it says 'forever' because otherwise your animation will just stop. You can edit how long you want each image to show for by clicking the little arrow at the top of the frame. I use 1 second. Keep going like this until you have finished (if you are adding more in). When you are done, go to File>Save for Web & Devices, then make sure it is set as a .gif file. Then click save and you are done!! This is how mine turned out.  Please don't use it. Hope this helped ~Cindykt *********PLEASE RATE THIS TUTORIAL*********** Last edited by Cindykt; 04-28-2011 at 12:41 AM. 
|
|
| Thread Tools | |
| Display Modes | |
|
|
 Similar Threads
|
||||
| Thread | Thread Starter | Forum | Replies | Last Post |
| Simple adopts | superdude44 | Adoptables Buzz | 2 | 06-03-2013 06:09 PM |
| Simple Feature | Abronsyth | Suggestions and Feature Requests | 3 | 03-31-2013 09:48 AM |
| Help with HTML & BBCodes and animated pets | A.F.M | Questions and Supports | 2 | 08-25-2012 07:32 PM |
| Free Animated Bases! | Cindykt | Art Gallery | 0 | 04-29-2011 01:38 AM |
| I need a simple code | Cosma | Questions and Supports | 2 | 01-26-2010 05:55 AM |

What's New? |
What's Hot? |
What's Popular? |


 Hybrid Mode
